|
UV GUIDE
UK
Advances
in Reptile Lighting
A
resource for all reptile keepers
|
|
Using
the Solarmeter 6.5 UVI and 6.2 UVB Meters
and the ZooMed Digital Radiometers
Instructions
for Use Solar
Recordings Recordings
in the vivarium
Setting
up a Test Bench Iso-irradiance
Charts
Comparing
Meters Problems?
Feature:
Make Yourself an Iso-irradiance Chart
|
|
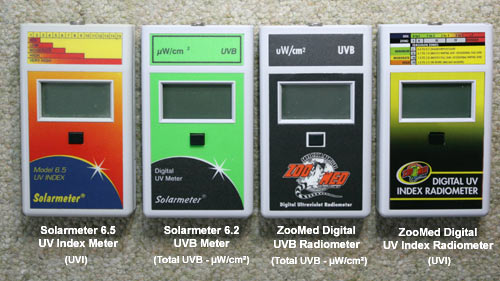
Fig.1
shows the range of UVB meters we use in all our tests. These
meters are easy to use and we have found the readings to
be consistent and reliable. The UVB meters are of two types:
the "UVB Meter" which measures the total UVB across
the entire wavelength range (280 - 320nm) in microwatts
per square centimetre (µW/cm²), and the "UV Index Meter"
which gives a reading with greater sensitivity to the shorter
UVB wavelengths, responsible for vitamin D3 synthesis in
the skin.
The
UVB meters are sold by Solartech under the brand name Solarmeter
6.2, and by ZooMed under their own label as the ZooMed Digital
UVB Radiometer. (These models are identical apart from their
branding.)
The
UV Index meters are sold by Solartech as the Solarmeter
6.5, and by ZooMed as the ZooMed Digital UV Index Radiometer.
(These models are also identical apart from their branding.)
To make
life a lot simpler, the meters will simply be referred to
as "Solarmeter 6.2" or "Solarmeter 6.5"
in the following discussion.
Instructions
for Using your Meter with Reptile Lamps
1.
Open top flap of leather carry-case to uncover sensor.
2.
Aim the sensor at the light source. Do not touch
the sensor or hold it against the surface of the
lamp.
3.
Press the on/off button below the LCD display.
4.
Read LCD display, which gives the amount of UVB
reaching the sensor in either µW/cm² (UVB meter)
or UVI units (UVI meter).
5.
Using very slow, small movements, tip the meter
to scan for the best alignment - which will give
you the highest reading on the display. This is
the reading to record.
To
record the output of a lamp,
hold the meter with the sensor at a specific distance
from the lamp surface. We
suggest that if only one measurement is to be taken,
this is at the standard distance of 12
inches, or 30 centimetres.
Lamps of the same brand anywhere in the world may
only be compared easily if all recordings are made
at the same distance from the lamp. We welcome your
recordings to add to our database.
12" is a useful "standard" distance
since it is often stated to be the maximum
distance at which a standard reptile UVB fluorescent
tube should be used, and several mercury vapour
lamps are designed with this as the minimum
recommended
distance from the reptile.
Some more powerful lamps have minimum recommended
basking distances greater than 12". For these
lamps we suggest that at the very least, a recording
be made at their "recommended" minimum
distance, as well.
To
find out the UVB your reptiles are receiving,
hold the meter in the basking spot, so that the
sensor is at the level of the reptile's back, aimed
directly at the UV lamp.
|
A
little more detail...
The
Solarmeter Model 6.2 UVB /ZooMed Digital UVB Radiometer
The Solarmeter 6.2 UVB meter, designed and made by Solartech,
Inc. was the first meter ever sold to reptile keepers that
was reasonably accurate, yet still affordable. (http://www.solarmeter.com/model62.html)
This meter was used in all our earlier tests, and is still
claimed to be the most accurate hand held UVB meter on the
market. This very instrument has been used in research into
vitamin D3 synthesis at the Vitamin D, Skin and Bone Laboratory
at Boston University Medical Center 19
and in numerous other research projects worldwide.
This meter estimates the total UVB radiation falling on
its sensor (it responds to wavelengths from UVC right up
to and including a little short-wavelength UVA at about
330nm). It has very high precision - 1µW/cm² - so it is
extremely useful for the monitoring of decay in any one
lamp, and in measuring very low levels of UVB both in the
field and in the vivarium.
Its
broadband response (typical of all UVB meters) to the entire
UVB waveband, however, causes a problem if we want to compare
the ability of different lamp brands to enable vitamin D3
synthesis, or to match up sunlight and lamp UV levels. Solar
Vitamin D3 synthesis almost all occurs between 290 - 315nm,
but the shorter the wavelength, even within this small range,
the greater the effect.
In theory, if one lamp had most of its UVB in the shorter
wavelengths, e.g., below 305nm, whereas another had most
of its UVB in the longer wavelengths, e.g., above 315nm,
they could both give identical readings with a Solarmeter
6.2, but the first lamp would be much better at producing
vitamin D3 than the second one.... it might even have unwanted
UVB from below 290nm or even UVC, and cause skin or eye
damage.......
This is also why UVB readings from natural sunlight cannot
be used as guides to "suitable" readings from
a lamp in a vivarium. Natural sunlight has a far greater
proportion of its UVB in the longer wavelengths. Most reptile
UVB lamps have the exact opposite to this, with a higher
percentage of their UVB in the more photo-reactive, shorter
wavelengths. To put it crudely, their UVB is "stronger".
This problem was highlighted when in 2006-7, certain fluorescent
lamps with quite low UVB readings caused eye and skin damage
in many reptiles 4.
These lamps emitted extremely short-wavelength UVB; only
small doses of radiation from these lamps could burn living
skin very quickly.
For
these reasons, a few years ago several researchers started
looking away from broadband UVB meters and concentrating
on finding something to measure just the wavelengths responsible
for vitamin D3 synthesis (and, in excess, cause harm to
skin and eyes). A spectrometer is ideal for laboratory work,
but extremely unlikely to be available to reptile keepers
or herpetologists out in the field.... a handheld meter
was still needed....
Fortunately
for us, Solartech had launched the Solarmeter 6.5 UV Index
meter.
The
Solarmeter Model 6.5 UV Index Meter/ZooMed Digital UV Index
Radiometer
The
UV Index meter created by Solartech (http://www.solarmeter.com/model65.html)
performed extremely well in comparison trials with other
UVI meters and a research-grade spectrometer 72.
 The
UV Index (UVI) is an internationally-recognised, unitless
measurement of the intensity of the photoreactive part of
the spectrum of sunlight (or any light containing ultraviolet).
It is often included in weather forecasts. It is based upon
an integration of the spectrum of the sunlight (or lamp)
with the action spectrum for human erythema, ie., sunburning
73. The
UV Index (UVI) is an internationally-recognised, unitless
measurement of the intensity of the photoreactive part of
the spectrum of sunlight (or any light containing ultraviolet).
It is often included in weather forecasts. It is based upon
an integration of the spectrum of the sunlight (or lamp)
with the action spectrum for human erythema, ie., sunburning
73.
Of course this is totally irrelevent for reptiles and amphibians!
...but that action spectrum is very close to the action
spectrum for vitamin D3 synthesis, which of course we ARE
interested in. It's not a perfect overlap, but interestingly,
the response curve of the Solarmeter 6.5 meter appears to
follow the D3 action spectrum even more closely than it
does the erythema action spectrum. It provides a good enough
match, in fact, for the readings from Solarmeters with this
sensor/filter combination to act as a proxy for the vitamin
D3-producing ability of the light source 74.
The
match is very good indeed. We have calculated that the 6.5
meter's sensor response from two different years of manufacture
(when inevitable differences between batches of sensors/
filters occur) were 96.0% and 93.2% matches, respectively,
to the CIE pre-vitamin D3 spectrum from 290 - 400nm. This
is impressive for a relatively inexpensive instrument. What
this means is that although Solarmeter 6.5 UV Index meters
are still broadband meters with, of course, the previously
described disadvantages still applicable, the very specific
sensitivity response negates most of their effects. Hand-held
meters can never be "accurate" in the same way that a spectrometer
can be. From a practical point of view, however, we believe
that a Solarmeter 6.5 is more than adequate for matching
the output of a lamp with a known, safe spectrum with that
of sunlight, when setting up a UV gradient in a vivarium
indoors.
New
recommendations for suitable UVB gradients in vivaria are
being developed based upon field studies recording the UV
Index in the microhabitat of numerous species in the wild.
The pioneering work in this field was done by Dr. Gary Ferguson
and his research team from Texas Christian University 75.
This paper has been used as the basis for establishing what
have been named the "Ferguson Zones" - a simple
division of reptile and amphibian species into 4 "Zones"
or "UVI ranges" based upon their basking behaviours
and microhabitat, which together determine their daily UV
exposure.
The Ferguson Zones have been used by the British and Irish
Association of Zoos and Aquaria's Reptile and Amphibian
Working Group's UV guide, now published in the Journal of
Zoo and Aquarium Research 76
and have been added to the labelling and the instruction
leaflet for the ZooMed UV Index meter 77.
They are also appearing on some manufacturer's instructions
for UV lighting products.
Each
of our new lamp test result files
(coming soon) will contain a page with a simple guide to
the Ferguson Zones.
Measuring
UVB with the UVB and UVI meters
The
meter is small, fitting easily in one hand, and is powered
by an ordinary 9v battery. The sensor is at the top of the
meter, and to take a reading, the operator simply aims the
meter directly at the UV source and presses a button on
the front of the unit. The amount of UV reaching the sensor
at that moment is displayed on the LCD panel.
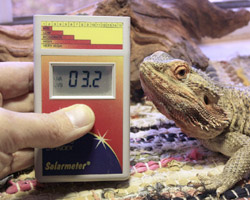
In the case of the Solarmeter 6.2, the readout is
in microwatts per square centimetre (uW/cm²). If, for example,
the reading was 023 uW/cm², this would mean that a square
centimetre of reptile skin would be getting 23 microwatts
of UVB at that point.
The Solarmeter 6.5 readings are of the unitless UV
Index scale. If, for example, the reading was 03.5, this
means that the reptile skin would be getting UVI 3.5 at
that point.
The sensor is extremely sensitive, with minute changes in
the angle between sensor and source causing variations in
the readings. Logically, the highest readings will be seen
when the sensor is most accurately aligned in the beam of
light; when taking hand-held recordings, it is adviseable
to "scan" for the best alignment with very slow,
very small movements. With practice, lining up the
sensor can be done fairly quickly and very accurately. When
taking recordings, we always use the highest readings obtained
consistently (i.e. on at least 2 to 3 "scans")
on each occasion.
What we have been able to do, with our hand-held radiometers,
is to look at the UV output of the sun, and of any light
source, and investigate in detail the initial output of
a new lamp; the decay in the output of a lamp with time;
and the characteristics of the UV "beam" for each type of
lamp - how far the UVB light extends from the lamp and in
what directions.
 Between
us we have taken many thousands of readings both outdoors
in natural sunlight and shade, and indoors from a wide range
of UV products. Between
us we have taken many thousands of readings both outdoors
in natural sunlight and shade, and indoors from a wide range
of UV products.
There's
more detail about our project, the accuracy of our readings
and comparisons with other work in this field in the Introduction
to the Lighting Survey (coming soon)
The
sections below describe the methods of recording we have
found the most useful when using the meter outdoors (for
solar recording), indoors in the vivarium, and on a simple
"test bench".
The
page concludes with a short section on comparing different
UVB meters, and a discussion of one or two problems which
might be encountered when using the Solarmeters, along with
their solutions.
|
|
Solar
Recordings
The
readings collected for our studies on UV
light in nature are mainly direct
readings, for which the meter is aimed directly at
the sun. These give a picture of the maximum UV which a
reptile could obtain if it was fully exposed to sunshine
at that location. (However, it's important to remember that
most wild reptiles only bask in full sun for any length
of time in the early morning, when the UV is not very strong.)
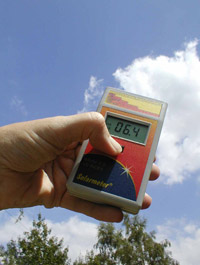
When
taking solar recordings, never
look directly at the sun. It is easiest to align
the meter whilst facing the sun. Hold the meter out at a
comfortable distance at just below shoulder level and "scan"
carefully by tipping the meter towards the sun, searching
for the highest reading.
 Readings
need to be taken out in the open, where trees or buildings
do not block a clear view of the sky. The sensor's field
of view is a full 180° with a cosine response curve - this
means that although it is most sensitive to whatever is
directly in line with it (in this case, the sun), it will
include diffused UVB from the sky around the sun in the
reading. If this "sky" includes the dark silhouette
of a building or tree, a lower reading will be obtained.
Conversely, if there are large reflective surfaces such
as water or snow beneath the sky, reflected and scattered
UV from these may result in a higher meter reading. Readings
need to be taken out in the open, where trees or buildings
do not block a clear view of the sky. The sensor's field
of view is a full 180° with a cosine response curve - this
means that although it is most sensitive to whatever is
directly in line with it (in this case, the sun), it will
include diffused UVB from the sky around the sun in the
reading. If this "sky" includes the dark silhouette
of a building or tree, a lower reading will be obtained.
Conversely, if there are large reflective surfaces such
as water or snow beneath the sky, reflected and scattered
UV from these may result in a higher meter reading.
Close
to sunrise and sunset, readings from the sky above the sun
may be slightly higher than those from the sun itself. This
is because light from closer to the horizon must pass through
a thicker layer of atmosphere. Water vapour in the air scatters
light of shorter wavelengths more strongly than longer wavelengths;
close to the horizon this thicker layer scatters enough
short-wavelength light to remove most of the ultraviolet
and blue. (This is why, of course, the rising or setting
sun appears only red or orange.)
If taking
a series of readings throughout a single day, ideally all
the readings should be taken from the same spot, so that
the readings are comparable one with another. It is also
important to record the exact time of each recording. As
the sun rises in the sky, the reduction in the thickness
of atmosphere through which the light is passing causes
an extremely rapid increase in UVB. We have recorded changes
of a microwatt a minute. For example, between 7.30am and
8am on June 10th 2005, in Wales, UK, under a clear sky,
the reading climbed from 40 to 70uW/cm². By 8.30am it was
105uW/cm² and by 9am it was 135uW/cm².
When
taking solar recordings, it's useful to note the weather
conditions; in particular, if the sun is shining, is it
in a clear, deep blue sky or is there high cloud or haze?
The increase in water vapour in the sky due to these will
reduce the UVB levels reaching the ground.
If
there is total cloud cover, direct solar recordings may
not be possible. So-called "global" recordings
usually give the highest readings with 100% overcast skies.
To obtain these, the meter is held vertically, to record
from the zenith (directly above the observer).
When
recording for a database, you may also wish to record the
location (latitude and altitude) at which the recording
was made. If your country is using Daylight Saving Time
this too needs adding to your report; and remember, if so,
the sun will reach its highest point in the sky, and UVB
its maximum level, around 1.00pm Local Time rather than
at noon.
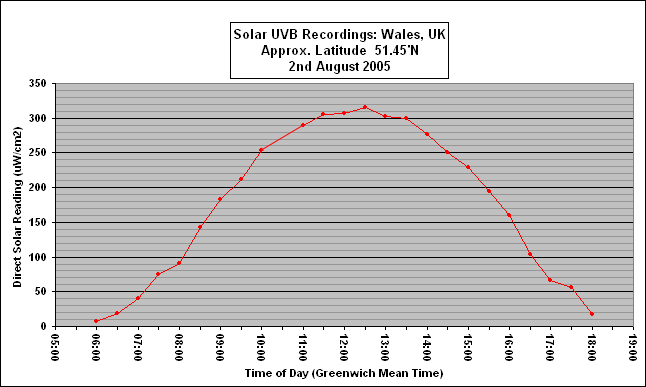
Fig.4
shows recordings made with a Solarmeter 6.2 during the course
of one clear day in August in Wales, UK. Faint high cloud
and haze in front of the sun has caused slight "dips"
in the graph at various times but the pattern is distinctive.
More details on solar recordings, and the ongoing Solar
Recording Project, are in our feature UV
light in nature and in the files section of the UVB_Meter_Owners
internet mailing group.
Fieldwork:
Recordings of UV "where the reptiles are"
One
of the most exciting uses of your meter - and the most important
- is to make recordings of the UV actually experienced by
a wild reptile or amphibian in its native habitat. When
you do this, there are a few important things to remember.
-
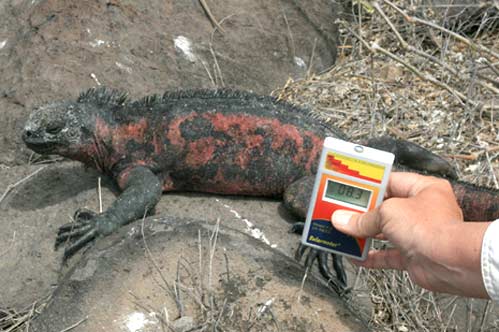
First of all, don't frighten the animal or disturb
it: keep your distance - you do not need to hold your
meter next to the animal! This is not just un-necessary
and likely to stress a wild animal, it could be dangerous
for you; it is also illegal to disturb protected species,
in many areas. Observe the animal's position carefully
and wait until it has moved well away from that spot,
then go to that spot, and take your reading from that
exact position, at animal level, aiming the meter sensor
towards the sun or sky, i.e., scan for the highest reading.
- If
the animal does not move away, just look around for an
area close by, which has the same type of ground cover
(rocks, plants, tree shade etc.) and take your reading
at reptile level, from that spot. Put on your record sheet
that this is an "estimate"...
-
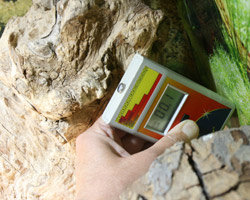
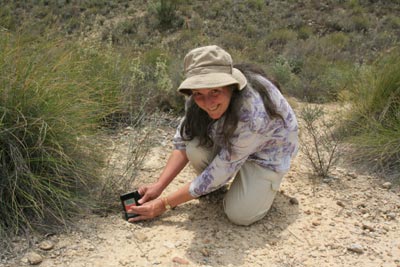 When
you are taking the reading, if possible stand, or crouch,
behind the meter (see Fig. 5) and make certain you are
not blocking the sensor's "view" of the light,
as this will result in a falsely low reading. When
you are taking the reading, if possible stand, or crouch,
behind the meter (see Fig. 5) and make certain you are
not blocking the sensor's "view" of the light,
as this will result in a falsely low reading.
- It's
helpful to take a "full sun" solar reading,
for comparison, as soon as possible after your reading
at the animal's location. Look for a nearby area in full
sunlight and take this reading as described in the previous
section. This will nearly always be higher than the reading
at animal level, because animals are usually at least
partially sheltered by foliage, rocks etc. in their microhabitat.
- Don't
forget to make a note of the time of day, and the location
of the animal. You might want to add details of the weather,
the temperature and describe what the animal was doing
(basking, foraging, etc.).
- Do
consider compiling your records and contributing to a
database or an online forum. The UV in the microhabitat
of most species is still unknown! UV Index recordings
are especially helpful as it is easier to relate these
to readings taken from lamps in the vivarium.
|
|
Recordings
in the Vivarium
Safety
Precaution: Always wear eye protection when studying UV
lamps.
However
careful you are, it is very difficult to take recordings
without looking directly at the lamp, especially when measuring
the distance from the lamp to the meter. Look for glasses
which state clearly that they offer 100% protection from
UV light.
Whereas
some fluorescent tubes, for example, emit (at 12" distance)
less UV light than is reflected by sunlit trees and
grass, and are thus unlikely to cause harm, some mercury
vapour lamps, at 12" distance, emit as much UVB as
the sun at the centre of their beam.
Intense
visible light may also damage your eyes. Even when wearing
glasses, avoid staring directly into any very bright lamp,
whether or not it emits UV, at close range.
Taking
readings
Assessment
of the UV in a vivarium can be done in minutes using a UVI
meter, holding it so that the sensor is, as far as possible,
at the level of the reptile's back. Readings should be taken
at the closest position the reptile can get to the lamp
in the basking zone (often, this is directly beneath it),
and at other "key" places in the vivarium, including
shady areas in the cool zone to ensure there is a good UV
gradient to close to zero in the shade. (Figs. 6,7,8)
More
accurate recordings, at known distances from a lamp, are
taken using a meter and a steel tape measure, ruler or measuring
stick. The end of the tape measure is positioned at the
surface of the tube or face of the lamp, and the meter is
positioned so that the sensor is at the required distance
from the light. This is the best way to monitor lamp decay.
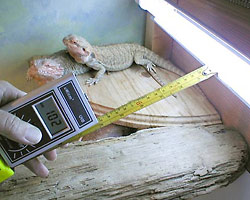 Because
the tape measure or ruler will inevitably block some light
from the sensor, it must be moved away before the
reading is taken. This manoeuvre takes a
little practice, as the meter must remain at the correct
distance while the tape measure is removed. Because
the tape measure or ruler will inevitably block some light
from the sensor, it must be moved away before the
reading is taken. This manoeuvre takes a
little practice, as the meter must remain at the correct
distance while the tape measure is removed.
With
fluorescent tubes, the highest
readings will be found when the meter is positioned perpendicular
to the axis of the tube, half-way along its length.
With
lamps and bulbs, the beam is
usually focused by internal reflectors and although, in
general, the highest readings are found directly in front
of the lamp face, this cannot be relied upon. Often, the
beam is at a slight angle from the perpendicular owing to
minute discrepancies in the alignment of the arc tube, glass
envelope, etc. The path of the UVB beam usually closely
follows that of the visible light and this can be used as
a first step in aligning the meter within the beam; thereafter,
careful scanning (in the same way as previously described
for a solar reading) will locate the "hot-spot"
at the chosen distance.
Fig.9
shows a steel tape measure being used to take a reading
from a fluorescent tube fitted with a reflector. (The
meter is one of the first Solarmeter 6.2 meters brought
into the UK - early versions had black labels.) First
the meter is positioned at the required distance (in this
example, 6 inches). Next, the meter is switched on and moved
around a little, at that distance, whilst scanning for the
maximum reading (i.e., aligning the meter). Then, the
tape measure is moved out of the way, a final
alignment made and the reading taken. In this example, the
reading increased from 102uW/cm² to 105uW/cm² with the removal
of the tape measure.
Sets
of readings may be taken from each lamp tested, at increasing
distances from the lamp, to give an indication of how far
the UVB penetrates into the vivarium. If readings are repeated
at intervals (for example, once a month), the decay of the
lamp throughout its lifespan may also be recorded.
If there
is more than one UV source in a vivarium, don't forget to
switch off the one you are not recording from, or it will
affect your results.
Watch
out for metal reflections in the vivarium. UVB is hardly
reflected at all from glass or perspex, which absorbs the
rays. Glass mirrors likewise reflect almost no UVB. However,
bare metal surfaces such as polished or brushed aluminium
reflect UVB strongly. You may obtain false high readings
from a lamp if the sensor picks up UV from the lamp's reflection
in a metal surface.
|
|
Setting
Up a Test Bench
 If
you want to take your study further, you may wish to set
up a simple test bench for the rapid, accurate measurement
of the UV output of your lamps. New lamps can be burned-in
whilst on the bench, making it easy to repeat daily measurements
precisely. Lamps on long-term testing can be temporarily
removed from the vivarium and placed on the bench for individual
tests, as well. If
you want to take your study further, you may wish to set
up a simple test bench for the rapid, accurate measurement
of the UV output of your lamps. New lamps can be burned-in
whilst on the bench, making it easy to repeat daily measurements
precisely. Lamps on long-term testing can be temporarily
removed from the vivarium and placed on the bench for individual
tests, as well.
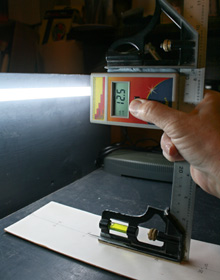
A simple
test bench for fluorescent tubes and compact lamps is easily
constructed on a table top or work surface. Fig. 10 shows
recordings being made from a fluorescent tube. The work
surface is dark, to reduce reflections. A measuring line
has been drawn on card placed so that the zero for the measuring
line is at the surface of the lamp. Compact lamps may be
place in simple lamp-holders positioned at the end of a
measuring line, in the same way.
 To
make life easy and eliminate the need for a tape measure,
the UVB meter has been temporarily attached to a set square
such that a pointer fixed to the base of the square, resting
on the measuring line, indicates the position of the sensor
directly above it. The distance from the tube to the meter
sensor can thus be measured accurately without a tape measure.
The meter is held steadily against the set-square using
blu-tack while it is moved along the measuring line, enabling
rapid recording of a set of measurements with no errors
due to hand-shake. To
make life easy and eliminate the need for a tape measure,
the UVB meter has been temporarily attached to a set square
such that a pointer fixed to the base of the square, resting
on the measuring line, indicates the position of the sensor
directly above it. The distance from the tube to the meter
sensor can thus be measured accurately without a tape measure.
The meter is held steadily against the set-square using
blu-tack while it is moved along the measuring line, enabling
rapid recording of a set of measurements with no errors
due to hand-shake.
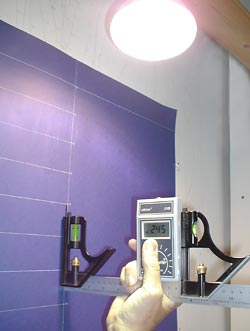
Mercury
vapour lamps, because of their directional beam, are more
conveniently tested whilst hanging pendant-fashion. If the
lamp-holder is secured to a ceiling or a horizontal beam
close to a wall, the measuring line may be drawn on the
wall, or on card affixed to the wall (Fig. 11.)
|
|
Iso-irradiance
Charts
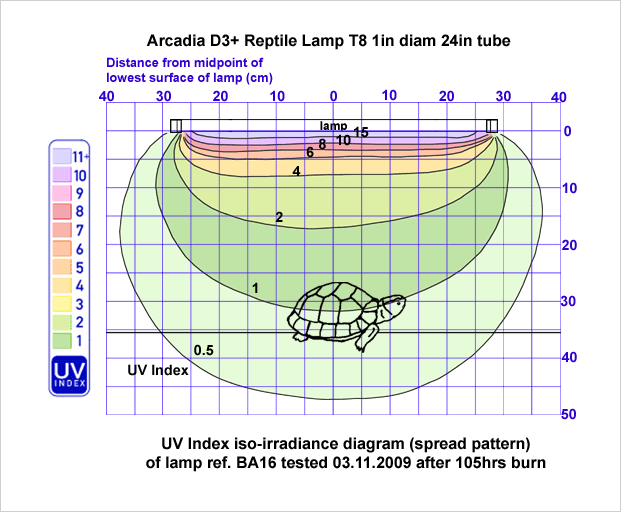 A
further development to the recording of the output of a
lamp in this simple linear style, is the production of an
iso-irradiance chart. This is a two-dimensional map of the
shape of the beam, constructed by plotting the UV gradient
under the lamp (e.g., Fig.12). Charts for each type of lamp
are featured in the Lighting Survey reports. A
further development to the recording of the output of a
lamp in this simple linear style, is the production of an
iso-irradiance chart. This is a two-dimensional map of the
shape of the beam, constructed by plotting the UV gradient
under the lamp (e.g., Fig.12). Charts for each type of lamp
are featured in the Lighting Survey reports.
To construct
a chart is not difficult, but it is time-consuming. If you
would like to make one yourself, full details may be found
in our article:
Make Yourself an Iso-irradiance
Chart
|
|
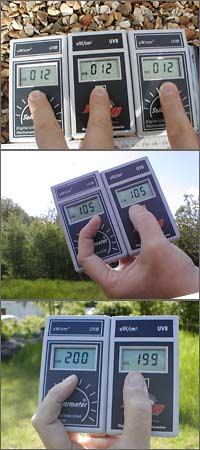 Are
all meters equal? Are
all meters equal?
All
our UV data has been compiled from readings taken with the
Solarmeter
6.2 and 6.5 meters or
their ZooMed equivalents. These Solarmeters are individually
calibrated by Solartech, by reading transfer from a standard
meter calibrated to NIST standards. They are claimed to
be accurate to at least ±10%. We have tested a number
of meters together, and have found that individual meters
are reasonably consistent with each other in the readings
they give from the same light source (as demonstrated in
fig. 13 with models of the Solarmeter 6.2 and the ZooMed
UVB meter).
For
technical reasons, however, it is
not possible
to combine or compare raw data from other
brands of radiometer, or even models from the same
manufacturer with different specifications. Experiments
conducted by Gehrmann et al (see references 18
and 19
on our reference page) have shown that even the most accurate
UV radiometers from different manufacturers may give very
different readings from the same light source. Reasons for
this may include differences in the response to different
wavelengths by different components in the sensors and filters,
or in their calibration. Gehrmann and his team used measurements
of the in-vitro production of vitamin D3 under UV light
to devise conversion factors for the readings from four
different meters. (Such work is outside the scope of this
project.)
|
|
Problems?
Low
Battery
The
Solarmeters run off a standard 9-volt DC battery which may,
according to the manufacturer, last for about two years
of "normal" use. Battery operation voltage is
9V down to 6.5V. Below 6.5V the LCD numbers will begin to
dim, indicating the need for battery replacement. The readings
remain accurate until the numbers begin to dim.
High Humidity and Heat
The
meters are sensitive to excessive humidity and heat. If
the meter is stored or used in a very hot or humid situation,
there can be a temporary false elevation of the reading
by several units. This is easily detected, as the meter
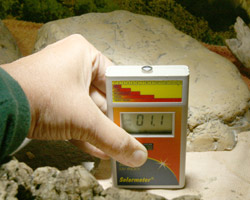
will not read "zero" with the cover over the sensor,
but give a reading of a few microwatts or UVI instead. Allowing
the meter to cool or dry out will resolve the problem. In
very humid environments, such as rainforests, the manufacturer
suggests storing the meter in a plastic bag with a sachet
of silica gel.
When
testing a high-wattage lamp, at close range the meter may
be affected by the heat. Our tests using two 100 watt mercury
vapour lamps showed that even as close as 4" from the
lamp surface, provided the readings are taken within 1-2
minutes there is little or no effect upon the reading. Longer
exposure to heat does cause a slow artificial rise in the
readings as the front of the meter gets hot. A change in
temperature from around 21-22°C, to around 44-50°C
produced a change in readings from 1 - 6uW/cm2 in a set
of 4 experiments with a Solarmeter 6.2 - a change of between
2-6%.
It is
worth bearing in mind that readings taken close to lamps
should therefore be taken fairly rapidly, within maybe a
half a minute or so, as holding a meter close to a hot bulb
for any length of time will cause a slow false rise in the
readings as the sensor is heated.
The
meter sensor should not be touched or held against the
surface of a lamp. Contact with any solid object can
produce minute electrical fields which create brief false
readings. More seriously, contact with the extremely hot
glass of some incandescent or mercury vapour lamps could
easily damage the sensor.
|
|
© 2015 UVGuide.co.uk
|


 Between
us we have taken many thousands of readings both outdoors
in natural sunlight and shade, and indoors from a wide range
of UV products.
  Readings
need to be taken out in the open, where trees or buildings
do not block a clear view of the sky. The sensor's field
of view is a full 180° with a cosine response curve - this
means that although it is most sensitive to whatever is
directly in line with it (in this case, the sun), it will
include diffused UVB from the sky around the sun in the
reading. If this "sky" includes the dark silhouette
of a building or tree, a lower reading will be obtained.
Conversely, if there are large reflective surfaces such
as water or snow beneath the sky, reflected and scattered
UV from these may result in a higher meter reading.
 When
you are taking the reading, if possible stand, or crouch,
behind the meter (see Fig. 5) and make certain you are
not blocking the sensor's "view" of the light,
as this will result in a falsely low reading.
 Because
the tape measure or ruler will inevitably block some light
from the sensor, it must be moved away before the
reading is taken. This manoeuvre takes a
little practice, as the meter must remain at the correct
distance while the tape measure is removed.
  If
you want to take your study further, you may wish to set
up a simple test bench for the rapid, accurate measurement
of the UV output of your lamps. New lamps can be burned-in
whilst on the bench, making it easy to repeat daily measurements
precisely. Lamps on long-term testing can be temporarily
removed from the vivarium and placed on the bench for individual
tests, as well.
 To
make life easy and eliminate the need for a tape measure,
the UVB meter has been temporarily attached to a set square
such that a pointer fixed to the base of the square, resting
on the measuring line, indicates the position of the sensor
directly above it. The distance from the tube to the meter
sensor can thus be measured accurately without a tape measure.
The meter is held steadily against the set-square using
blu-tack while it is moved along the measuring line, enabling
rapid recording of a set of measurements with no errors
due to hand-shake.
 A
further development to the recording of the output of a
lamp in this simple linear style, is the production of an
iso-irradiance chart. This is a two-dimensional map of the
shape of the beam, constructed by plotting the UV gradient
under the lamp (e.g., Fig.12). Charts for each type of lamp
are featured in the Lighting Survey reports.
  Are
all meters equal?